9 min read
Best Barcode Scanner Testing Tools for Developers
A practical review of the best barcode scanner testing tools for developers, QA teams, and POS engineers, with real-world tradeoffs and setup advice.
8 min read
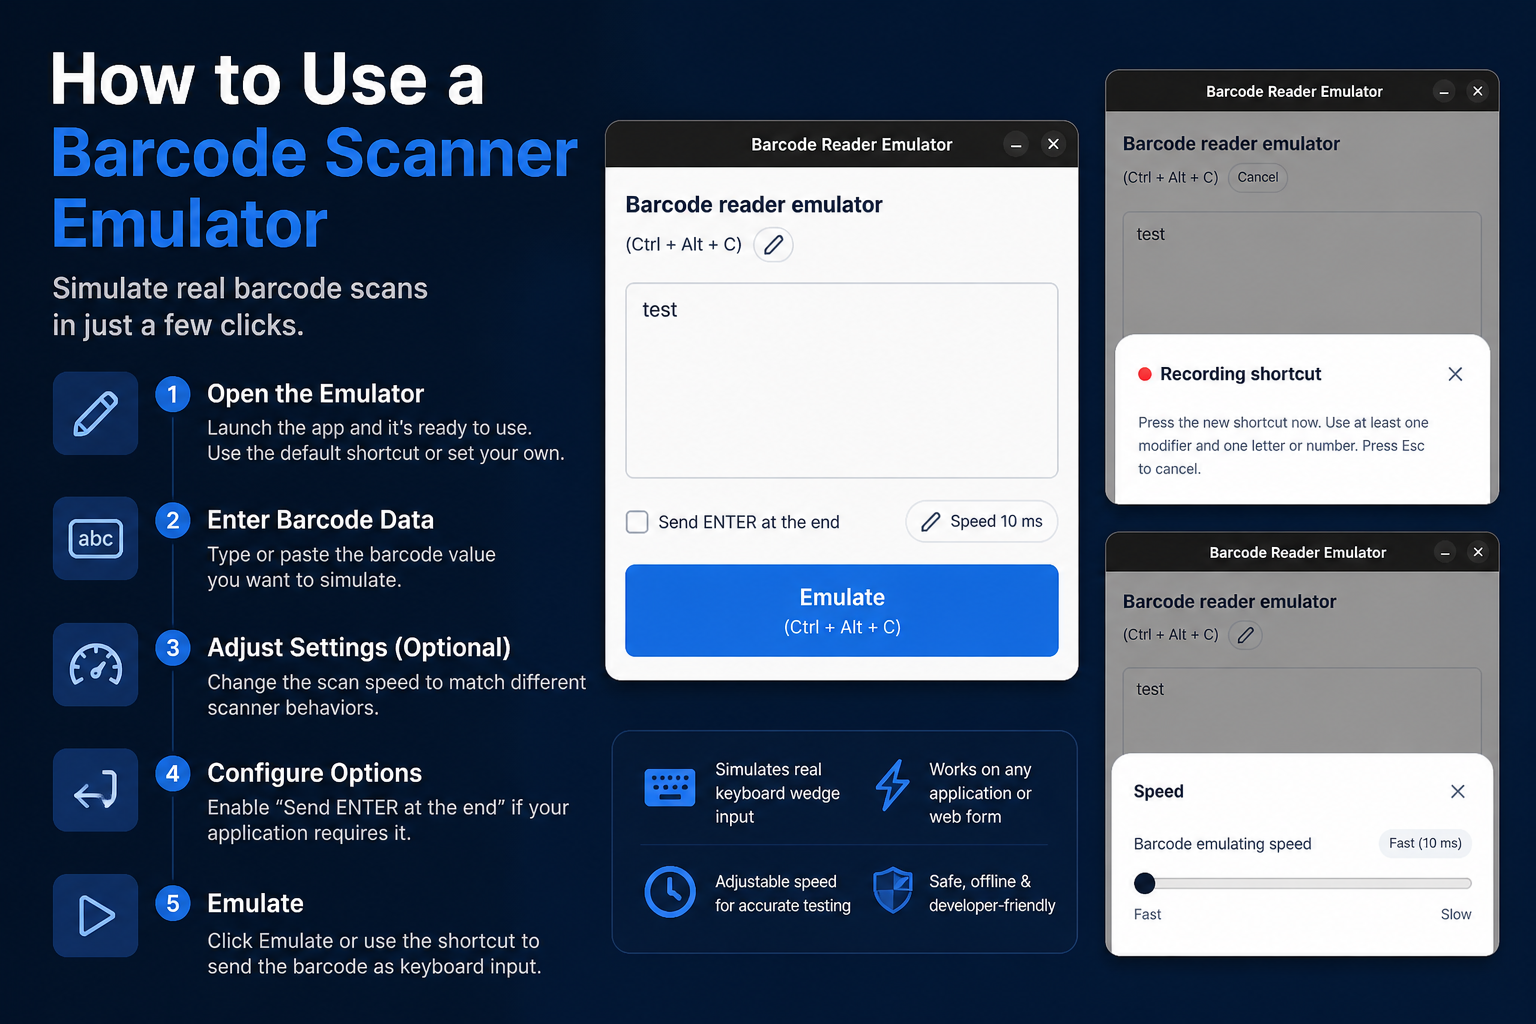
A barcode scanner emulator is one of the fastest ways to test scanner-driven workflows when the real device is unavailable, shared, or simply slowing down development. If you work on checkout flows, warehouse tools, internal admin screens, or POS software, being able to simulate barcode scanner input on demand makes debugging much less painful.
Most teams do not have a spare scanner sitting next to every developer laptop. Even when hardware exists, it is often plugged into a QA station, a shared POS terminal, or a staging lane that somebody else is already using. That makes simple debugging surprisingly slow.
A barcode emulator fixes that by letting you reproduce scanner-like keyboard input from your own machine. For everyday barcode scanner testing, that matters more than people expect. You can rerun the same scan, change timing, toggle an Enter suffix, and compare behavior without leaving your desk.
Typical use cases include:
Before configuring anything, decide what “correct” scanner behavior means for the workflow you are testing. Most USB scanners behave like a keyboard wedge. They type characters quickly into the focused field and often append Enter at the end.
That detail is important. If you only paste text into an input, you are not really testing how the screen behaves during a scan. You are only proving the field can hold the value. A good Barcode Scanner Emulator setup is useful because it helps you simulate barcode scanner behavior instead of replacing it with manual typing.
Avoid broad goals like “test scanning.” A better goal is something concrete, like:
That level of detail matters because barcode-related bugs often live in the steps around the scan. The barcode value itself may be valid, but the UI can still fail because focus moved, Enter fired too early, or a validation handler ran twice.
For e-commerce operations tools, the target might be an order lookup form. For POS testing, it is often the sale screen. For warehouse software, it might be a receiving form or stock count workflow.
The test value should look like the data your system receives in production. If your app expects EAN-13, use 13-digit values. If the backend maps barcode strings to internal SKUs, use barcodes that actually exist in your test data.
I strongly recommend keeping a short library of known values:
This sounds basic, but it is the difference between shallow testing and useful testing. Barcode scanner testing gets much better once you stop treating every scan as the same event.
Timing is where a lot of real bugs hide. Some interfaces behave perfectly when a value appears all at once, but fail when characters arrive in fast sequence. Others work until the scanner appends Enter and the screen submits at the wrong moment.
When you configure your barcode emulator, test more than one variation:
If your barcode workflow depends on debounced search, on-change validation, or focus management after a scan, this step is not optional. It is usually the difference between “works on my machine” and “works in production.”
In practice, focus bugs are more common than barcode parsing bugs. A scan can be technically correct and still fail the workflow because the cursor is sitting in the wrong field. That is why you should test the happy path and a few realistic mistakes.
For example, on a POS screen you may expect the product search field to regain focus after an item is added. If it does not, the next simulated scan might land in a quantity field, a discount field, or nowhere useful at all. An emulator is perfect for reproducing this because the same scenario can be triggered over and over without manual typing differences.
The most useful mindset is this: test the behavior around the scan, not just the value itself.
Most of the time, the barcode itself isn’t the problem.
It’s what the interface does right after the scan.
If you can reproduce that moment consistently — especially with timing and Enter behavior — you’ll fix issues much faster than relying on hardware alone.
Helpful next step
If you want to try these workflows in practice, start with the Barcode Scanner Emulator tool and then come back to the rest of the blog for more testing patterns.
9 min read
A practical review of the best barcode scanner testing tools for developers, QA teams, and POS engineers, with real-world tradeoffs and setup advice.
9 min read
A practical guide to POS testing without real hardware, including barcode scanner testing, staged workflows, and the limits of hardware-free validation.
8 min read
A practical comparison of keyboard wedge input and barcode emulators, including setup differences, tradeoffs, and where each one fits in barcode scanner testing.